

How To Set Header Text Color Reac Native Navigation Bar
React Native Configuring Header Bar
To configure the header bar of a React Native awarding, the navigation options are used. The navigation options are a static property of the screen component which is either an object or a part.
Header Bar Props
- headerTitle: It is used to set the title of the active screen.
- headerStyle: It is used to add style to the header bar.
- backgroundColor: It is used to change the background color of the header bar.
- headerTintColor: It is used to alter the color to the header championship.
- headerTitleStyle: Information technology is used to add customized style to the header title.
- fontWeight: It is used to set the font manner of the header championship.
- headerRight: It is used to add items on the right side of the header bar.
- headerLeft: Information technology is used to add items on the left side of the header bar.
Implementation: Now let's see how to configure the Header Bar:
-
Step ane: Open your terminal and install expo-cli past the following control.
npm install -g expo-cli
-
Step 2: At present create a projection by the following command.
expo init header-bar
-
Stride 3: Now get into your project folder i.due east. header-bar
cd header-bar
-
Step 4: Install the required packages using the following control:
npm install –relieve react-navigation-textile-lesser-tabs react-native-paper react-native-vector-icons
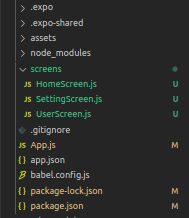
Projection Construction: The project directory should wait like the post-obit:
Example:In our case, nosotros will look at how to mode the header bar, how to add header buttons/icons to it, and acquire how to dynamically send information from one screen and brandish it as the header championship on some other screen.
App.js
import React from "react" ;
import { createAppContainer } from "react-navigation" ;
import { createStackNavigator } from "react-navigation-stack" ;
import HomeScreen from "./screens/HomeScreen" ;
import UserScreen from "./screens/UserScreen" ;
import SettingScreen from "./screens/SettingScreen" ;
const AppNavigator = createStackNavigator(
{
Dwelling: HomeScreen,
User: UserScreen,
Setting: SettingScreen,
},
{
defaultNavigationOptions: {
headerStyle: {
backgroundColor: "#006600" ,
},
headerTitleStyle: {
fontWeight: "bold" ,
color: "#FFF" ,
},
headerTintColor: "#FFF" ,
},
},
{
initialRouteName: "Home" ,
}
);
const Navigator = createAppContainer(AppNavigator);
export default function App() {
return (
<Navigator>
<HomeScreen />
</Navigator>
);
}
HomeScreen.js: Notice the navigation options. Hither, nosotros configure a header push component within our Header bar, which takes us to the Settings screen. Also, notice that nosotros transport the user input when we click on the "Go to user screen" button.
HomeScreen.js
import React, { useState } from "react" ;
import { Text, View, TextInput, Button } from "react-native" ;
import { Ionicons } from "@expo/vector-icons" ;
import {
Item,
HeaderButton,
HeaderButtons,
} from "react-navigation-header-buttons" ;
const Dwelling house = (props) => {
const [input, setInput] = useState( "" );
return (
<View fashion={{ flex: one, alignItems: "eye" , justifyContent: "center" }}>
<Text way={{ color: "#006600" , fontSize: forty }}>Home Screen!</Text>
<Ionicons name= "ios-dwelling" size={80} colour= "#006600" />
<TextInput
placeholder= "Enter your name"
value={input}
onChangeText={(value) => setInput(value)}
/>
<Push button
title= "Go to User Screen"
color= "#006600"
onPress={() => props.navigation.navigate( "User" , { username: input })}
/>
</View>
);
};
const HeaderButtonComponent = (props) => (
<HeaderButton
IconComponent={Ionicons}
iconSize={23}
colour= "#FFF"
{...props}
/>
);
Habitation.navigationOptions = (navData) => {
return {
headerTitle: "Habitation" ,
headerRight: () => (
<HeaderButtons HeaderButtonComponent={HeaderButtonComponent}>
<Item
championship= "Setting"
iconName= "ios-settings-outline"
onPress={() => navData.navigation.navigate( "Setting" )}
/>
</HeaderButtons>
),
};
};
export default Home;
UserScreen.js: Here we receive the user input which nosotros passed through the dwelling screen and gear up it as the title in out header bar.
UserScreen.js
import React from "react" ;
import { Text, View } from "react-native" ;
import { Ionicons } from "@expo/vector-icons" ;
const User = () => {
return (
<View mode={{ flex: 1, alignItems: "eye" ,
justifyContent: "center" }}>
<Text style={{ color: "#006600" , fontSize: 40 }}>
User Screen!
</Text>
<Ionicons name= "ios-person-circle-outline"
size={80} color= "#006600" />
</View>
);
};
User.navigationOptions = (navData) => {
return {
headerTitle: navData.navigation.getParam( "username" ),
};
};
export default User;
SettingScreen.js
import React from "react" ;
import { Text, View } from "react-native" ;
import { Ionicons } from "@expo/vector-icons" ;
const Settings = () => {
return (
<View style={{ flex: 1, alignItems: "heart" , justifyContent: "heart" }}>
<Text style={{ color: "#006600" , fontSize: 40 }}>Settings Screen!</Text>
<Ionicons proper name= "ios-settings-outline" size={80} color= "#006600" />
</View>
);
};
export default Settings;
Run the Application: Start the server by using the following control.
expo start
Output: Notice when you tap on a unmarried tab, in that location is a slight blitheness. This is automatically provided by the Cloth Bottom Tab Navigator.

Reference: https://reactnavigation.org/docs/headers/

Source: https://www.geeksforgeeks.org/react-native-configuring-header-bar/
Posted by: stephensgoolifter.blogspot.com
0 Response to "How To Set Header Text Color Reac Native Navigation Bar"
Post a Comment